Good Riddance - Green Day

Donate

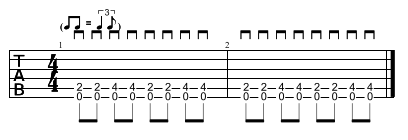
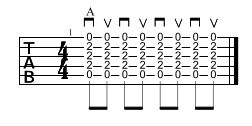
The song "Good Riddance" is a great beginner song for picking and strumming. If you notice at the beginning of the picking section as well as the strumming section, there are indications of which way to strum your pick. If you have a hard time with the rhythm of the strumming section, then keep the rhythm of the picking section throughout the song.

The song is in the key of G, so the main chords used are I - IV - V - vi. It is a classic chord progression. The chords used are also a bit different. You simply keep your third and fourth fingers on the 2nd and 1st strings respectively, both on the third fret.

We hope you enjoyed this song. If you have any comments or questions, you can contact us at patrice@paliatsky.com

I Can't Help Myself - The Four Tops

Donate

The song "I Can't Help Myself" from The Four Tops is a good easy song to learn to use triads. The chords that are written below are a suggestion, you could use any other shape of triads with the same rhythm and it would work. It's a very simple song in terms of chord progression.

The song is in the key of C, so the chord progression in the verse is I - V - ii - IV - V. So, if you wanted to improvise a melody or a solo, you could use C Major, A minor natural and A minor pentatonic or blues.

I Can't Help Myself - The Four Tops Guitar Music Sheet

I Can't Help Myself - The Four Tops Guitar Music Sheet

We hope you enjoyed this song. If you have any comments or questions, you can contact us at patrice@paliatsky.com

Drop 2 Chords

Donate

Drop 2 chords are a way to play chords with a 7th within the first four strings of the guitar. In theory, drop 2 refers to the second note from the top of the chord that you drop to the bottom of your original chord. Then, you do the same process for the three inversions of the chord as shown below.

Drop 2 Chords Theory

Drop 2 Chords Theory

Below are the different fingering for each of these chords. You can use them in different genres where you will use chords with a 7th extension. Each diagram shows the four different variations of shapes for each chord.

Drop 2 Major 7th Chords

Drop 2 Major 7th Chords

Drop 2 7th Chords (Dominant Chords)

Drop 2 7th Chords (Dominant Chords)

Drop 2 Minor 7th Chords

Drop 2 Minor 7th Chords

If you have any questions, please contact us at patrice@paliatsky.com

Barre Chords

Donate

Barre chords are very versatile, they give you the possibility to play every chord that exists. A barre chord simply means that at least two notes are played with one finger. 

In this lesson, we will look at barre chords based on the E string and A string. These barre chords are played using the shape of an A chord and the shape of an E chord. Find the root note of the chord you are looking for on the string of your choice, than put your fingers in the appropriate shape.

Below is the fingering for the barre chords. When you play those, make sure that your thumb is directly behind and parallel to your first finger (index) on you fretting hand. Barre chords take a long time to get good at, because you need to develop the strength in your thumb and index. It's not a comfortable position either, so practice often, but not for long periods of time. Be patient with those, but practice them often.

Barre Chords on E String

Barre Chords on E String

For major barre chords on the A string, you can try either fingering. You might prefer to barre with your index and your third finger depending on the size of your fingers.

Barre Chords on A String

Barre Chords on A String

If you have any questions, please contact us at patrice@paliatsky.com

Triads

Donate

Triads are basic chords (root, third and fifth) played on the three first strings of the guitar. There are three shapes for minor and major chords. The three shapes are based on barre chords on the E string, A string and D string.

Triads A Shapes

Triads A Shapes

Triads D Shapes

Triads D Shapes

Triads E Shapes

Triads E Shapes

Below are the three shapes of triads in major and minor.

Triads

Triads

If you have any questions, please contact us at patrice@paliatsky.com

Minor Scale

Donate

The minor scale is a very important scale, as it gives you that dark sound that the major scale won't provide. This scale is considered as: 1, 2, 3b, 4, 5, 6b, 7b. The "b" next to the notes mean flat, which is related to the major scale. So, compared to a regular major scale like C Major scale: C, D, E, F, G, A, B; the minor scale would be: C, D, Eb, F, G, Ab, Bb. If you were in the key of E Major you would have: E, F#, G#, A, B, C#, D#; but if you were in the key of E minor, you would have the notes: E, F#, G, A, B, C, D. Notice, that having flats next to the numbers in the minor scale doesn't necessarily mean that your notes will be flat, but rather that they will be one half tone lower than its major counter part.

Below is a graphic showing what the minor scale looks like on the guitar. The green colour is the root note. So, you simply need to find the root note for the key signature you are playing in and start the scale from there.

Minor Scale (Guitar)

Minor Scale (Guitar)

Practice going up and down this scale to remember it well.

If you have any questions, please contact us at patrice@paliatsky.com

Major Scale

Donate

The major scale is the most basic scale in music and it is the one that every other scales get compared to. This scale is considered as being: 1, 2, 3, 4, 5, 6, 7. What that means is that this scale has no modification and it has seven notes. This scale, just like every other scales, is used for melodies, solos, riffs, etc.

If you were in the key signature of C, the notes of the scale would be: C, D, E, F, G, A, B

Below is a graphic showing what the major scale looks like on the guitar. The green colour is the root note. So, you simply need to find the root note for the key signature you are playing in and start the scale from there.

Major Scale (Guitar)

Major Scale (Guitar)

Practice going up and down this scale to remember it well.

If you have any questions, please contact us at patrice@paliatsky.com

Major Pentatonic Scale Positions

Donate

The notes of the major pentatonic scale can be found everywhere on the neck of the guitar. Therefor, there are positions to help you remember where the notes are. 

Below is a graphic showing what the pentatonic scale positions looks like on the guitar. The green colour is the root note. So, you simply need to find the root note for the key signature you are playing in and start the scale from there.

Position 2 starts on the second note of position 1; position 3 starts on the second note of position 2, etc. Each position is connected with the following one, position 5 being connected with position 1. 

Major Pentatonic Scale Positions

Major Pentatonic Scale Positions

To remember all those positions, practice them individually going up and down. Once you feel comfortable with each of them, try to combine them to help you remember them and understand how to use them in solos. You can go up one position, then down the next position. Be creative!

You can try to practice improvising using this blues track below. The Blues is in E, so use E major Pentatonic.

If you have any questions, please contact us at patrice@paliatsky.com

Minor Pentatonic Scale Positions

Donate

The notes of the minor pentatonic scale can be found everywhere on the neck of the guitar. Therefor, there are positions to help you remember where the notes are. 

Below is a graphic showing what the pentatonic scale positions looks like on the guitar. The green colour is the root note. So, you simply need to find the root note for the key signature you are playing in and start the scale from there.

Position 2 starts on the second note of position 1; position 3 starts on the second note of position 2, etc. Each position is connected with the following one, position 5 being connected with position 1. 

Minor Pentatonic Scale Positions

Minor Pentatonic Scale Positions

To remember all those positions, practice them individually going up and down. Once you feel comfortable with each of them, try to combine them to help you remember them and understand how to use them in solos. You can go up one position, then down the next position. Be creative!

You can try to practice improvising using this blues track below. The Blues is in E, so use E minor Pentatonic.

If you have any questions, please contact us at patrice@paliatsky.com

Major Pentatonic Scale

Donate

The major pentatonic scale is as useful a scale as the minor pentatonic. Just like it's counter part, the major pentatonic is made of five notes that work well on genres from Blues, Rock 'n' Roll to jazz, pop, etc. 

The major pentatonic scale is made of: Root (1), second (2), major third (3), fifth (5) and major sixth (6). So, if you were in the key of C, the notes would be: C, D, E, G, A

Below is a graphic showing what the pentatonic scale looks like on the guitar. The green colour is the root note. So, you simply need to find the root note for the key signature you are playing in and start the scale from there.

Major Pentatonic Scale (Guitar)

Major Pentatonic Scale (Guitar)

This scale is used to improvise solos, create riffs and melodies. The best way to work this scale is to practice playing going up and down the scale in different keys, so that your fingers get used to it. Once you are comfortable with it, you can start improvising with it, playing the notes of the scale with a rhythm and order of your choice. You can try to practice improvising using this blues track below. The Blues is in E, so use E major Pentatonic.

If you have any questions, please contact us at patrice@paliatsky.com

Minor Pentatonic Scale

Donate

The Pentatonic scale is probably the most useful scale in almost any genre. It is one of the first scale taught and one of the last one you'll use. Penta meaning 5 and tonic meaning tone or note; the scale has only five notes, compared to most scales that have seven notes. 

The minor pentatonic notes are: root (1), minor third (3m), fourth (4), fifth (5) and minor seventh (7m). So, if you were in the key of C it would mean: C, Eb, F, G, Bb

Below is a graphic showing what the pentatonic scale looks like on the guitar. The green colour is the root note. So, you simply need to find the root note for the key signature you are playing in and start the scale from there.

Minor Pentatonic Scale Guitar

This scale is used to improvise solos on different genres or to create riffs and melodies. The best way to work this scale is to practice playing going up and down the scale in different keys, so that your fingers get used to it. Once you are comfortable with it, you can start improvising with it, playing the notes with a rhythm and order of your choice. You can try to practice improvising using this blues track below. The Blues is in E, so use E minor Pentatonic.

We hope you enjoyed this lesson. If you have any questions or comments you can contact us at patrice@paliatsky.com

Blues Turnaround

Donate

This lesson is all about classic blues turnaround in the key of E. A turnaround is usually played on the last two measures of a Blues form. It is called the turnaround, because it brings you back to the beginning of the song. Turnarounds can also be used to start a song, which is what the first exercises focuses on.

Blues Form Turnaround

Blues Form Turnaround

This turnaround #1 shows one of the most classic turnarounds. 

Turnaround #1

Turnaround #1

Turnaround #2 shows a classic variation of a blues turnaround.

Turnaround #2

Turnaround #2

Turnaround #3 is another variation of the classics.

Turnaround #3

Turnaround #3

The next two examples are full blues form starting with a turnaround and finishing with a turnaround.

This first example uses the turnaround #1 that we worked on above in a blues form.

This second example uses the turnaround #2 that we used above in a blues form.

If you have any questions, please contact us at patrice@paliatsky.com

Open Chord Chart

Donate

Here is an open chord chart for guitar. Open chords mean that there is at least one string that is played open. The green colour notes are the root note of the chords. The red colour with an X mean that you don't play that string. The numbers in the circles are the fingers that you use for those notes. The fingers used are a suggestion only; depending on the size and shape of your fingers, you might find that using different fingers works better for you. Also, depending on which chord comes before or after a certain chord, you might find that using a different combination works better.

Open Chord Chart

Open Chord Chart

If you have any questions, please contact us at patrice@paliatsky.com

Electric Guitar Parts

Donate

When playing guitar, it is important to know the parts on your guitar.

Electric Guitar Parts

Electric Guitar Parts

Tuning Pegs: Used to tune the guitar.

Nut: Where your strings converge together.

Fret Wire: The metal pieces on the neck of the guitar. 

Fret: Between the fret wires, they are where you place your fingers to create sounds.

Markers: They help you remember where the notes are on the guitar, because notes are at different places on each strings.

Guitar Strap Holder: It is where you put your strap to play standing up.

Bridge: It is where you put your hand to palm mute your notes.

Pick Up: They are electro magnets that pick up the sound of your strings and send the signal to the amplifier

Pick Guard: It is there to protect the finish of your guitar, so that you don't scratch it.

Pick Up Selector: It is used to switch pick ups; it changes the sound of your guitar when plugged into an amplifier.

Volume Knob: It is used to change the amount of signal sent to the amplifier. If you have distortion in your sound, reducing the volume on your guitar will reduce the amount of distortion.

Tone Knob: It changes the brightness of your sound.

If you have any questions, please contact us at patrice@paliatsky.com

Reading Tablature

Donate

Tablature, also called tabs, is the easiest way to read music for instruments like guitar, bass guitar, ukulele, mandolin, etc. It is easier than reading the treble clef, because it relates to the instruments better. Treble clef is easy to read on piano, because each note on the staff relates to a note on the piano. On the guitar on the other hand, each note on the staff relates to several of the same notes on different strings. Also, certain techniques on the guitar do not relate well on a staff.

Therefor, below is an example of a measure in tablature. 

If you have any questions, please contact us at patrice@paliatsky.com

Beginner Blues Rhythm Guitar Lesson

Donate

Basic Blues Chords

These chords are the basic power chords that you will use for the blues in E. Usually, you should use your second finger to play the black notes on the grid for E5 and A5, but in this case, I suggest that you use your first finger, so that you'll be able to alternate between your first and third finger for the following exercises.

E Blues Chord Chart

E Blues Chord Chart

Exercise #1

This first exercise is a basic blues riff played on the measures of E in the blues form above. The pattern starts with a power chord that you play with your first finger on the second fret and alternate with your third finger every second and fourth beat.

E Blues Rhythm #1

E Blues Rhythm #1

Exercise #2

This second exercise is the same pattern, but starting on the fifth string (A string) for all the measures during which you will play an A. You alternate between your first finger and your third finger.

A Blues Rhythm #1 

A Blues Rhythm #1 

Exercise #3

This third exercise is simply a power chord of B on the A string that you usually play for only one measure during a blues form, but in this case it's just for practice, so you'll be playing two measures.

B Blues Rhythm #1

B Blues Rhythm #1

Blues Form using Exercise #1, 2, 3

Now that you know what to play for every measure, you can try to play every measure of E with the pattern from E Blues Rhythm #1, every measure of A should be played with the pattern from A Blues Rhythm #1 and every measure of B with the B Blues Rhythm #1. You can try it several times to get good at it. If the recording is too fast, practice it slower than the song, then try it again later with the audio file.

E Blues Form 

E Blues Form 


Blues Rhythm Variations

Exercise #4

This exercise is a variation of the E Blues Rhythm #1. You simply will add your 4th finger on the 5th fret on every third beat. If you don't have enough dexterity to reach with your pinky, you can also slide to the 5th fret with you third finger.

E Blues Rhythm #2

E Blues Rhythm #2

Exercise #5

This exercise is a variation of the A blues #1. Just like with the exercise #4, you simply have to add your pinky finger on the 5th fret on every third beat.

A Blues Rhythm #2

A Blues Rhythm #2

Exercise #6

This variation of B Blues Rhythm #1 is not easy, it requires a lot of flexibility. You will need to play your power chord of B with your first and second finger, so that you can manage to stretch to the 6th fret with your pinky finger. 

B Blues Rhythm #2

B Blues Rhythm #2

Exercise #7

This exercise is a variation of E Blues Rhythm #2. You simply play the original exercise, but you palm mute every note. To palm mute, you simply need to put the palm of your picking hand on the bridge of your guitar to mute the sound of it. You have to be aware that if your hand touches the strings too much, you won't get any sound and if your hand is too far on the bridge, then you won't get any muffling of the sound that  you're looking for.

E Blues Rhythm #2 Palm Muting

E Blues Rhythm #2 Palm Muting

Blues form using Exercise #4, 5, 6, 7

Now that you have practiced all the variations of the blues rhythms, you can try to put them all together in one form of blues just like in the E Blues Form #1 exercise. If the audio file is too fast for you, then practice without it until you can build up the speed to play with the song. All the blues forms are played swing.


Full Chords Blues

E Blues Chord Chart #2

E Blues Chord Chart #2

Above are the full chords of E, A and a bigger version of our original B power chord. These chords are used to replace the guitar rhythms that we were using for the previous exercises. In this blues form, we use full chords strumming down only on the beats as shown on the examples below.

E Blues Chord Form #1

E Blues Chord Form #1

E Blues Chord Form #1A

E Blues Chord Form #1A

E Blues Chord Form #1B

E Blues Chord Form #1B


Below are the chords for the E Blues Chord Form #2. It's the same thing as with E Blues Chord Form #1, but this time you will play every eight note with a down, then up stroke.

E Blues Chord Form #2

E Blues Chord Form #2

E Blues Chord Form #2A

E Blues Chord Form #2A

E Blues Chord Form #2B

E Blues Chord Form #2B


Finally here is the last exercise of this lesson. It is a bit harder than the other ones. You have to play the same chord progression as the E Blues Chord Form #2, but you only play the upbeats and the first beat of every measure.

E Blues Chord Form #3

E Blues Chord Form #3

E Blues Chord Form #3A

E Blues Chord Form #3A

E Blues Chord Form #3B

E Blues Chord Form #3B


To finish this lesson, here are 2 forms of a blues in E without the guitar, so that you can practice the different variations of the blues that you learned in this lesson.

We hope you enjoyed this lesson, if you have comments or suggestion please don't hesitate to contact patrice@paliatsky.com. Otherwise, you can help us create more lessons by donating at the top of this page. Thank you!