Beginner Theory

Donate

Music theory is important no matter which instrument you want to play. It is the back bone of the language of music. We use the piano to show theory, as it is the most visual instrument, but know that it is the same for every instrument.

Notes

The basics of music starts with the natural notes: A, B, C, D, E, F, G

If this seems easy, then try saying those letters without looking at them, but in the reverse order. It seems a silly thing to do, but it ends up being very useful, because when you play music, you will play those notes going up and down all the time. So, below is a keyboard to show you the notes and the distance between the notes. Notice that there are black keys between all the notes, except for B - C and E - F.

Piano Diagram #1

Piano Diagram #1

The next thing to know is what sharps (#) and Flats (b) are; to understand that you need to know what half tones are.  Half tones are the distance between any key to the next, so from a white key to a black key, or a black key to a white key, or two white keys next to the other, but without a black key in between. The distance of two half tones together are called a tone or full tone or whole tone.

Now, a sharp (#)is when you take a natural note, like C, and go half a tone higher, it becomes C#. If you take the same note and go half a tone lower it becomes Cb. So, every black key can be called by two different names depending on the situation. 

Piano Diagram #2

Piano Diagram #2

Rhythm

The most important thing in music is rhythm. Even though most people will focus more on the notes that they are playing, if you don't have rhythm, you don't have a song and you can't play with anyone. 

First thing to know is the name and value of each note and rest, because for each note there is a rest of equal value. 

Notes Pyramid

Notes Pyramid

Rests Pyramid

Rests Pyramid

You may have noticed that each note has a fraction written in brackets next to its name. It is simply because each note has a value relative to the other ones. So, depending on the time signature, notes will have a different value. A time signature is what tells you at the beginning of a music sheet what kind of rhythm the song will have. The example on the right shows a measure that has four quarter notes and the example below shows a measure with six eighth notes.

Measure #2

Measure #2

Measure #1

Measure #1

If you have any questions, you can contact us at patrice@paliatsky.com

Beginner Blues Rhythm Guitar Lesson

Donate

Basic Blues Chords

These chords are the basic power chords that you will use for the blues in E. Usually, you should use your second finger to play the black notes on the grid for E5 and A5, but in this case, I suggest that you use your first finger, so that you'll be able to alternate between your first and third finger for the following exercises.

E Blues Chord Chart

E Blues Chord Chart

Exercise #1

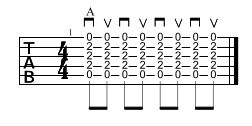
This first exercise is a basic blues riff played on the measures of E in the blues form above. The pattern starts with a power chord that you play with your first finger on the second fret and alternate with your third finger every second and fourth beat.

E Blues Rhythm #1

E Blues Rhythm #1

Exercise #2

This second exercise is the same pattern, but starting on the fifth string (A string) for all the measures during which you will play an A. You alternate between your first finger and your third finger.

A Blues Rhythm #1 

A Blues Rhythm #1 

Exercise #3

This third exercise is simply a power chord of B on the A string that you usually play for only one measure during a blues form, but in this case it's just for practice, so you'll be playing two measures.

B Blues Rhythm #1

B Blues Rhythm #1

Blues Form using Exercise #1, 2, 3

Now that you know what to play for every measure, you can try to play every measure of E with the pattern from E Blues Rhythm #1, every measure of A should be played with the pattern from A Blues Rhythm #1 and every measure of B with the B Blues Rhythm #1. You can try it several times to get good at it. If the recording is too fast, practice it slower than the song, then try it again later with the audio file.

E Blues Form 

E Blues Form 


Blues Rhythm Variations

Exercise #4

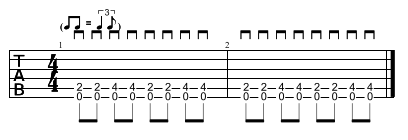
This exercise is a variation of the E Blues Rhythm #1. You simply will add your 4th finger on the 5th fret on every third beat. If you don't have enough dexterity to reach with your pinky, you can also slide to the 5th fret with you third finger.

E Blues Rhythm #2

E Blues Rhythm #2

Exercise #5

This exercise is a variation of the A blues #1. Just like with the exercise #4, you simply have to add your pinky finger on the 5th fret on every third beat.

A Blues Rhythm #2

A Blues Rhythm #2

Exercise #6

This variation of B Blues Rhythm #1 is not easy, it requires a lot of flexibility. You will need to play your power chord of B with your first and second finger, so that you can manage to stretch to the 6th fret with your pinky finger. 

B Blues Rhythm #2

B Blues Rhythm #2

Exercise #7

This exercise is a variation of E Blues Rhythm #2. You simply play the original exercise, but you palm mute every note. To palm mute, you simply need to put the palm of your picking hand on the bridge of your guitar to mute the sound of it. You have to be aware that if your hand touches the strings too much, you won't get any sound and if your hand is too far on the bridge, then you won't get any muffling of the sound that  you're looking for.

E Blues Rhythm #2 Palm Muting

E Blues Rhythm #2 Palm Muting

Blues form using Exercise #4, 5, 6, 7

Now that you have practiced all the variations of the blues rhythms, you can try to put them all together in one form of blues just like in the E Blues Form #1 exercise. If the audio file is too fast for you, then practice without it until you can build up the speed to play with the song. All the blues forms are played swing.


Full Chords Blues

E Blues Chord Chart #2

E Blues Chord Chart #2

Above are the full chords of E, A and a bigger version of our original B power chord. These chords are used to replace the guitar rhythms that we were using for the previous exercises. In this blues form, we use full chords strumming down only on the beats as shown on the examples below.

E Blues Chord Form #1

E Blues Chord Form #1

E Blues Chord Form #1A

E Blues Chord Form #1A

E Blues Chord Form #1B

E Blues Chord Form #1B


Below are the chords for the E Blues Chord Form #2. It's the same thing as with E Blues Chord Form #1, but this time you will play every eight note with a down, then up stroke.

E Blues Chord Form #2

E Blues Chord Form #2

E Blues Chord Form #2A

E Blues Chord Form #2A

E Blues Chord Form #2B

E Blues Chord Form #2B


Finally here is the last exercise of this lesson. It is a bit harder than the other ones. You have to play the same chord progression as the E Blues Chord Form #2, but you only play the upbeats and the first beat of every measure.

E Blues Chord Form #3

E Blues Chord Form #3

E Blues Chord Form #3A

E Blues Chord Form #3A

E Blues Chord Form #3B

E Blues Chord Form #3B


To finish this lesson, here are 2 forms of a blues in E without the guitar, so that you can practice the different variations of the blues that you learned in this lesson.

We hope you enjoyed this lesson, if you have comments or suggestion please don't hesitate to contact patrice@paliatsky.com. Otherwise, you can help us create more lessons by donating at the top of this page. Thank you!